Installing WordPress on cPanel is one of the first things every new website owner needs to do — and the good news is it takes less than 10 minutes.
Whether you’re using Hostinger, Bluehost, SiteGround, or any other cPanel-based hosting provider, the process is almost identical. Most hosts now include a one-click WordPress installer that makes the entire process beginner-friendly.
In this complete step-by-step guide, you’ll learn:
- How to log into cPanel
- Two methods to install WordPress — one-click and manual
- How to complete the WordPress setup after installation
- Common installation errors and how to fix them
- What to do immediately after installing WordPress
Let’s get your WordPress site live. 👇
What You Need Before Starting
Before installing WordPress, make sure you have:
| Requirement | Detail |
|---|---|
| Web hosting account | With cPanel access (Hostinger, Bluehost, SiteGround, etc.) |
| Domain name | Pointed to your hosting server |
| cPanel login details | Username and password from your host |
| Email address | For your WordPress admin account |
📖 If you haven’t chosen hosting yet, read: Shared Hosting vs VPS vs Cloud Hosting: Which to Choose
📖 If you need a domain name first, read: How to Choose a Domain Name
How to Access cPanel
Every hosting provider gives you access to cPanel in one of these ways:
Method 1 — Direct URL:
yourdomain.com/cpanel
OR
yourdomain.com:2083
Method 2 — Hosting Dashboard:
- Log into your hosting account (Hostinger, Bluehost, etc.)
- Go to your hosting dashboard
- Click “cPanel” or “Manage Hosting”
Method 3 — Welcome Email: Check your hosting welcome email — it contains your cPanel login URL, username, and password.
Once logged in, you’ll see the cPanel dashboard with dozens of icons organized into sections.

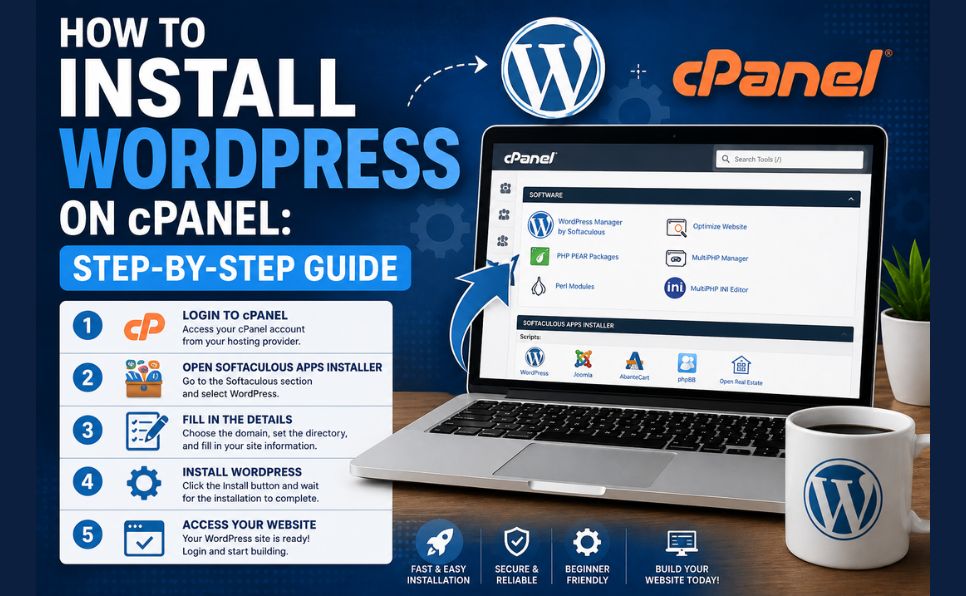
Method 1: Install WordPress Using One-Click Installer (Recommended)
This is the easiest and fastest method. Most hosting providers include Softaculous, Fantastico, or their own WordPress installer inside cPanel.
Step 1: Find the WordPress Installer
Inside cPanel, scroll down to find one of these sections:
- “Softaculous Apps Installer” — most common
- “WordPress Manager” — some hosts like Hostinger use this
- “WordPress” — direct icon on some hosts
- “Fantastico” — older hosts may use this
Click on the WordPress icon.
Step 2: Click “Install Now”
On the Softaculous WordPress page, you’ll see:
- WordPress overview and features
- Current version (always use the latest)
- An “Install Now” button
Click “Install Now” to proceed to the installation form.
Step 3: Configure Your Installation
Fill in these details carefully:
Software Setup:
| Field | What to Enter |
|---|---|
| Choose Protocol | Select https:// (if SSL is active) or http:// |
| Choose Domain | Select your domain from the dropdown |
| In Directory | Leave BLANK for root install (yourdomain.com) |
⚠️ Important: Leave the “In Directory” field empty unless you want WordPress in a subfolder (like yourdomain.com/blog). Most beginners want it at the root.
Site Settings:
| Field | What to Enter |
|---|---|
| Site Name | Your website name (can be changed later) |
| Site Description | A brief tagline (can be changed later) |
Admin Account:
| Field | What to Enter |
|---|---|
| Admin Username | Choose a unique username (NOT “admin” — security risk) |
| Admin Password | Strong password — minimum 12 characters |
| Admin Email | Your real email address (for password recovery) |
💡 Security tip: Never use “admin” as your username. It’s the first thing hackers try. Choose something unique like your name or brand.
Choose Language: Select English or your preferred language.
Step 4: Click Install
Scroll to the bottom and click the “Install” button.
Softaculous will now:
- Create a database for WordPress
- Download and configure WordPress files
- Set up your admin account
- Apply your settings
This takes 30–60 seconds.
Step 5: Installation Complete
Once finished, you’ll see a success message with two important URLs:
| URL | Purpose |
|---|---|
learnearninfo.com |
Your live website (what visitors see) |
yourdomain.com/wp-admin |
Your WordPress admin dashboard |
Save both URLs — especially the wp-admin link. This is where you’ll manage your entire website.
Method 2: Install WordPress Manually on cPanel
If your host doesn’t include a one-click installer, or if you prefer more control, you can install WordPress manually. This takes about 15–20 minutes.
Step 1: Download WordPress
Go to wordpress.org/download and download the latest version of WordPress as a ZIP file.
Step 2: Create a Database
WordPress needs a MySQL database to store all your content.
In cPanel:
- Find “MySQL Databases” and click it
- Under “Create New Database” — enter a name (e.g.,
mysite_db) and click “Create Database” - Under “MySQL Users” — create a new user with a strong password and click “Create User”
- Under “Add User to Database” — select your new user and database, click “Add”
- In the privileges screen — check “All Privileges” and click “Make Changes”
Save these details — you’ll need them:
- Database name
- Database username
- Database password
- Database host (usually
localhost)
Step 3: Upload WordPress Files
- In cPanel, go to “File Manager”
- Navigate to “public_html” (this is your website’s root folder)
- Click “Upload” and upload the WordPress ZIP file you downloaded
- After upload, right-click the ZIP file and select “Extract”
- Move all extracted files from the
wordpressfolder intopublic_html(not inside a subfolder) - Delete the empty
wordpressfolder and the ZIP file
Step 4: Run the WordPress Installation
Open your browser and go to yourdomain.com
You’ll see the WordPress installation wizard. Follow these steps:
Step 4a — Choose Language: Select your language and click Continue.
Step 4b — Database Connection: Enter the database details you saved earlier:
- Database Name:
mysite_db - Username: your database username
- Password: your database password
- Database Host:
localhost - Table Prefix:
wp_(change this to something unique for better security — e.g.,x7k_)
Click “Submit” then “Run the Installation”
Step 4c — Site Information: Fill in:
- Site Title
- Username (avoid “admin”)
- Password (strong)
- Your Email
Click “Install WordPress”
Step 5: Log In
Click “Log In” and enter your credentials. You’re now in your WordPress dashboard.
What to Do Immediately After Installing WordPress
Your WordPress installation is live — but it needs several important setup steps before publishing any content.
1. Set Your Permalink Structure
By default, WordPress uses ugly URLs like yourdomain.com/?p=123. Fix this immediately:
WordPress Admin → Settings → Permalinks →
Select "Post name" →
yourdomain.com/your-post-title/
Save Changes
2. Install an SSL Certificate
If your site shows “http://” instead of “https://”, install SSL:
- In cPanel → find “SSL/TLS” or “Let’s Encrypt”
- Click “Install Certificate” for your domain
- It’s free — powered by Let’s Encrypt
After installing SSL, update your WordPress URLs:
WordPress Admin → Settings → General →
Change both URLs from http:// to https://
Save Changes
📖 Learn why SSL matters for your website: What Is SSL Certificate and Why Your Website Needs It
3. Install Essential Plugins
Install these free plugins immediately after setup:
| Plugin | Purpose |
|---|---|
| RankMath SEO | SEO optimization, sitemaps, schema |
| WP Rocket / W3 Total Cache | Page caching and speed |
| Wordfence Security | Malware scanning and firewall |
| UpdraftPlus | Automatic backups |
| Akismet | Spam comment protection |
How to install plugins:
WordPress Admin → Plugins →
Add New → Search plugin name →
Install Now → Activate
4. Delete Default Content
WordPress comes with demo content that should be removed:
Posts → Delete "Hello World" post
Pages → Delete "Sample Page" (or customize it)
Comments → Delete the default comment
5. Set Your Timezone
WordPress Admin → Settings → General →
Timezone → Select your timezone →
Save Changes
6. Configure Reading Settings
If your site is not ready to be public yet:
WordPress Admin → Settings → Reading →
"Discourage search engines from indexing this site" →
Check this box ONLY while in development →
UNCHECK immediately before launch
7. Submit to Google Search Console
After launch, submit your site to Google so it gets indexed:
- Go to Google Search Console
- Add your property
- Verify ownership via HTML tag (add through RankMath)
- Submit your sitemap:
yourdomain.com/sitemap_index.xml
📖 Complete guide to getting indexed on Google: How to Get Your Website Indexed Faster on Google
Common WordPress Installation Errors — And How to Fix Them
Error 1: “Error Establishing a Database Connection”
Cause: Wrong database credentials entered during setup.
Fix:
- Open
wp-config.phpin File Manager - Verify database name, username, password, and host are correct
- Make sure the database user has full privileges
Error 2: “Sorry, This File Type Is Not Permitted”
Cause: WordPress blocking certain file uploads for security.
Fix: Add this to your wp-config.php file:
define('ALLOW_UNFILTERED_UPLOADS', true);Error 3: WordPress Installed in Subfolder (yourdomain.com/wordpress/)
Cause: Files were uploaded inside a wordpress subfolder instead of directly into public_html.
Fix: Move all files from public_html/wordpress/ directly into public_html/ and update your WordPress address in Settings → General.
Error 4: “This Site Can’t Be Reached” After Installation
Cause: Domain not yet pointed to your hosting server.
Fix: Check your domain’s nameservers — they should match your hosting provider’s nameservers. DNS propagation can take 24–48 hours.
Error 5: White Screen of Death After Activation
Cause: Plugin or theme conflict, or memory limit too low.
Fix:
- Rename your plugins folder via File Manager (
plugins→plugins_disabled) - Access your site — if it works, a plugin is the cause
- Rename back to
pluginsand deactivate one by one to find the culprit
WordPress cPanel Installation Checklist
Use this checklist to ensure your installation is complete and secure:
Installation:
- Hosting account active and cPanel accessible
- Domain pointed to hosting server
- WordPress installed (one-click or manual)
- Admin username is NOT “admin”
- Strong admin password set
- Correct admin email address saved
Post-Installation Setup:
- Permalink structure set to “Post name”
- SSL certificate installed and active (https://)
- WordPress URLs updated to https://
- Timezone set correctly
- Default “Hello World” post deleted
- Sample page deleted or customized
Essential Plugins:
- RankMath SEO installed and configured
- Caching plugin installed (WP Rocket or W3 Total Cache)
- Security plugin installed (Wordfence)
- Backup plugin installed (UpdraftPlus)
Google Integration:
- Google Search Console set up
- Sitemap submitted to GSC
- “Discourage search engines” unchecked (if site is live)
Conclusion — Your WordPress Site Is Live
Installing WordPress on cPanel is one of the simplest technical tasks in website creation — and with the one-click installer, most beginners complete it in under 10 minutes.
Quick recap:
- Log into cPanel via your hosting dashboard
- Find Softaculous or WordPress installer
- Fill in your site details and admin credentials
- Click Install — done in 60 seconds
- Complete essential post-installation setup
Once WordPress is installed and configured, the real work begins — building your site, creating content, and optimizing for search engines.
Frequently Asked Questions (FAQ)
Is installing WordPress on cPanel free?
Yes — WordPress itself is completely free and open source. You only pay for your hosting and domain name. The cPanel one-click installer (Softaculous) is typically included free with your hosting plan.
How long does it take to install WordPress on cPanel?
Using the one-click installer (Softaculous), WordPress installation takes 2–5 minutes including setup. The manual method takes 15–20 minutes. Either way, your site is live same day.
Can I install WordPress on a subdomain?
Yes — during installation, select your subdomain (e.g., blog.yourdomain.com) from the domain dropdown instead of your main domain. The process is identical.
What is the difference between WordPress.com and WordPress.org?
WordPress.org is the self-hosted version — you download the software and install it on your own hosting (what this guide covers). WordPress.com is a hosted service where WordPress manages everything — but with significant limitations on customization and monetization. For full control, always use WordPress.org on your own hosting.
Can I install multiple WordPress sites on one cPanel account?
Yes — most hosting plans allow multiple domains. Simply repeat the installation process for each domain, creating a separate database for each WordPress installation.
What should I do if I forget my WordPress admin password?
Go to yourdomain.com/wp-login.php and click “Lost your password?” Enter your admin email address — WordPress will send a password reset link. Alternatively, reset it through cPanel’s phpMyAdmin by editing the wp_users table directly.
Found this guide helpful? Share it with someone setting up their first WordPress site. Have a question about WordPress installation? Drop it in the comments — we answer every one!